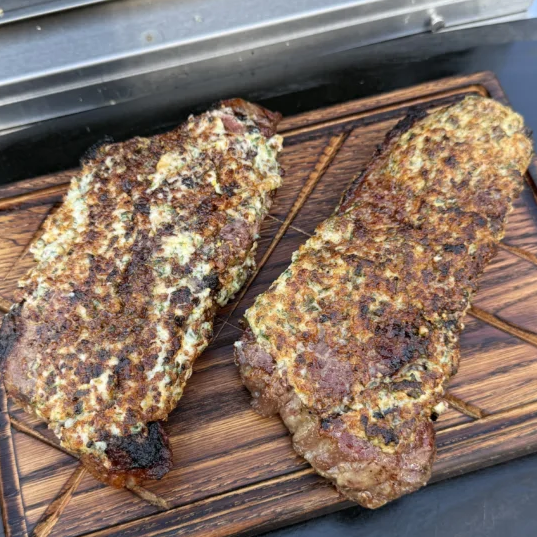
A seared strip steak topped with melting garlic herb compound butter is a full meal in minutes. On an infrared grill, active searing takes just a few minutes, and the intense top-down heat forms a deep crust while keeping the interior pink and juicy.
Why Does an Infrared Grill Cook Strip Steaks Differently?
Infrared changes two things at once: how the heat reaches the meat and how fast the surface browns. Both matter for a grilled strip steak.
Top-Down Radiant Heat vs. Bottom-Up Convection
A standard gas or charcoal grill heats air below the food. That hot air rises, surrounds the steak, and gradually browns the surface through convection. Drippings fall into the flame, causing flare-ups that leave bitter, sooty spots.
An infrared grill works the opposite way. The burner sits above the steak and radiates energy directly downward onto the surface, the same principle used by salamander broilers in steakhouse kitchens. Because radiant energy transfers heat faster than moving air, browning begins rapidly once surface moisture evaporates. Oil and juices drip away from the heat source instead of into it, so there are no flare-ups.
Faster Sear, Less Moisture Loss
Infrared burners reach 1,500°F in three to five minutes. At that temperature, a strip steak develops a full crust in roughly one to two minutes per side, depending on thickness and rack position.
On a conventional grill running 450 to 550°F, the same crust takes four to five minutes per side. During those extra minutes, more internal moisture evaporates. The result is a drier steak with a thicker band of gray, overcooked meat beneath the surface.
Shorter sear time means juicier meat and a thinner gradient between crust and center.

How to Pick and Prep a Strip Steak for Infrared Grilling
The cut and thickness you start with determine how the steak responds to high heat. Getting this right saves you from overcooking.
Ideal Thickness: 1.25 to 1.5 Inches
Strip steaks thinner than one inch overcook before a proper crust forms, especially under infrared heat. Steaks thicker than two inches need a two-stage approach (covered below). The 1.25 to 1.5 inch range gives you the widest margin for error: enough time for a deep sear on the outside while the center stays at your target doneness.
Look for steaks with visible marbling throughout the meat. USDA Choice grade works well; Prime grade adds more intramuscular fat and richness. Either will perform on infrared.
Surface Prep: Dry and Season Simply
Pat both sides completely dry with paper towels. Surface moisture is the enemy of browning. Every drop of water on the surface must evaporate before the Maillard reaction can begin, and that costs you time and heat.
Season with kosher salt and freshly cracked black pepper only. Avoid rubs containing sugar. At 1,500°F, sugar carbonizes in seconds, leaving a bitter, acrid taste instead of caramelization. The compound butter adds all the flavor you need.
Let the steak sit at room temperature for 20 to 30 minutes before grilling. A cold center takes longer to reach target temperature and increases the risk of an overcooked exterior.
Garlic Herb Compound Butter Recipe
This compound butter takes five minutes to make and stores in the fridge for up to a week or in the freezer for three months. Make it before you start grilling so the log is firm enough to slice into clean medallions.
Ingredients
- 8 oz (2 sticks) unsalted butter, softened to room temperature
- 4 cloves garlic, finely grated with a microplane
- 1 tablespoon fresh rosemary, minced
- 1 tablespoon fresh thyme leaves, minced
- 2 tablespoons fresh flat-leaf parsley, minced
- 1 tablespoon fresh chives, minced
- ½ teaspoon kosher salt
Instructions
- Combine all ingredients in a bowl and mix with a fork until the herbs are evenly distributed.
- Spoon the mixture onto a sheet of parchment paper and shape it into a log about 1.5 inches in diameter.
- Twist both ends closed and refrigerate for at least one hour until firm.
- Slice into half-inch rounds when ready to serve.
Microplane-grated garlic distributes more evenly than minced garlic and avoids sharp raw garlic pockets. Fresh herbs are non-negotiable here. Dried herbs lack the aromatic oils that bloom when butter melts over a hot steak.
Two Variations Worth Trying
Blue cheese and walnut: Replace the herbs with 3 oz crumbled blue cheese, 2 tablespoons chopped toasted walnuts, and 1 tablespoon minced chives. Rich, sharp, and classic with strip steak.
Smoked paprika and lime: Add 1 tablespoon smoked paprika, 1 teaspoon red pepper flakes, and the zest of one lime. A bolder option with some heat that pairs well with grilled vegetables on the side.
How to Cook Strip Steak on an Infrared Grill: Step by Step

The right method depends on your steak's thickness. Here are two approaches, each with specific timing for infrared heat.
Direct Sear Method (for 1 to 1.5 Inch Steaks)
This is the standard approach and the fastest way to a finished steak.
- Preheat the infrared grill for three to five minutes on maximum heat.
- Place the strip steak on the grate directly below the burner.
- Sear for approximately one to two minutes on the first side without moving it. Exact time varies with rack position and steak thickness.
- Flip once. Sear the second side for approximately one to two minutes.
- Check internal temperature with an instant-read thermometer. Pull at 125 to 130°F for medium-rare (the steak will rise another 3 to 5°F during rest).
- Rest for five minutes before slicing.
Total active cook time: approximately three to five minutes. Always rely on your thermometer rather than the clock.

Reverse Sear Method (for 1.5 Inch and Thicker Steaks)
Thick steaks benefit from a low-and-slow warm-up before the final sear. The reverse sear eliminates the gray band of overcooked meat that forms when thick cuts spend too long under direct high heat.
- Place the steak on a wire rack over a sheet pan. Cook in a 250°F oven until internal temperature reaches 110 to 115°F (approximately 25 to 35 minutes depending on thickness).
- Remove from the oven. Transfer immediately to the preheated infrared grill.
- Sear each side for approximately 30 to 60 seconds. The surface will already be dry from the oven, so the crust forms rapidly under infrared heat.
- Rest for three to five minutes. The slow oven stage has already equalized the internal temperature, so a long rest is not required.
The result is edge-to-edge pink from surface to center, with a thin, deeply browned crust on the outside.

Infrared Grill Strip Steak: Temperature and Time Reference
| Steak Thickness | Method | Approximate Time per Side (Infrared) | Pull Temperature | Final Temperature (after rest) |
| 1 inch | Direct sear | ~1 to 1.5 min | 125 to 130°F | 130 to 135°F (medium-rare) |
| 1.25 inches | Direct sear | ~1 to 2 min | 125 to 130°F | 130 to 135°F (medium-rare) |
| 1.5 inches | Reverse sear + infrared finish | ~30 to 45 sec | 125 to 130°F | 130 to 135°F (medium-rare) |
| 2 inches | Reverse sear + infrared finish | ~45 to 60 sec | 125 to 130°F | 130 to 140°F (medium-rare to medium) |
All times are approximate and will vary with rack position and individual grill conditions. For steaks under 1.5 inches, expect 3 to 5°F of carryover rise. For thicker cuts (1.5 inches and above), expect 5 to 10°F of carryover. An instant-read thermometer is the only reliable way to confirm doneness on an infrared grill, where 15 to 20 seconds can shift the result.
When Should You Add Compound Butter to a Grilled Steak?
Adding butter at different stages creates different flavor and texture effects.
During Rest vs. at the Table
Placing a compound butter medallion on the steak as soon as it comes off the grill means the butter melts completely during the rest period. The garlic and herb flavors soak into the meat fibers, creating deeper seasoning throughout each bite. The visual effect is subtle since the butter has fully absorbed.
Placing the butter right before serving gives you the dramatic slow-melt presentation. The butter pools around the steak and stays on the surface, acting more like a sauce than an infusion.
The best approach uses both moments: a small piece at the start of rest for flavor penetration, and a second medallion right before serving for visual impact and richness.
3 Common Mistakes When Cooking Steak on an Infrared Grill
Infrared cooks faster and hotter than gas.
Using Sweet or Sugar-Based Rubs
Sugar burns at infrared temperatures. Any rub with brown sugar, honey powder, or maple will turn black and bitter in under a minute. Stick to salt, pepper, and garlic powder. Let the compound butter handle the flavor.
Applying Gas Grill Timing to Infrared
Infrared cooks roughly twice as fast as a conventional gas grill at the same distance from the heat source. If your usual strip steak takes four minutes per side on gas, start checking at two minutes on infrared. First-time infrared users should position the grate at a lower rack setting (farther from the burner) and work upward as they learn the timing.
Skipping the Thermometer
At 1,500°F, the window between medium-rare and medium-well is measured in seconds, not minutes. An instant-read thermometer removes all guesswork. Insert it into the thickest part of the steak horizontally for the most accurate reading.
Sear Your Next Strip Steak on an Infrared Grill
A 1.25-inch strip steak, seasoned with salt and pepper, seared under infrared heat for approximately one to two minutes per side, and finished with a cold medallion of garlic herb compound butter delivers a meal that rivals any steakhouse plate. The infrared method produces a faster sear, a juicier interior, and a thinner overcooked zone than any conventional grill can match. Try it on a Big Horn® 1500°F Infrared Steak Grill and taste the difference top-down radiant heat makes.
FAQs About Infrared Grill Strip Steak
Q1: Can I Use a Cast-Iron Skillet Instead of an Infrared Grill for This Recipe?
Yes. A cast-iron skillet heated until smoking (around 500 to 600°F) will produce a good sear. The crust will take longer to form (three to four minutes per side), and you will get more smoke indoors. The compound butter recipe works the same regardless of cooking method.
Q2: Can I Add the Compound Butter While the Steak Is Still on the Infrared Grill?
Not recommended. At 1,500°F, butter melts and burns within seconds, and dripping butter can cause smoke. Always add the compound butter after removing the steak from the grill, either during the rest or at serving.
Q3: What Side Dishes Pair Well with Infrared-Grilled Strip Steak?
Grilled asparagus, roasted potatoes, and a simple arugula salad with shaved parmesan are all strong pairings. The compound butter also works on grilled bread or roasted vegetables if you have extra.
Q4: Is the Reverse Sear Method Necessary for a 1.25-Inch Strip Steak?
No. A 1.25-inch strip steak is thin enough for direct high-heat searing on an infrared grill without a low-temperature pre-cook stage. Reverse sear adds value primarily for steaks 1.5 inches and thicker, where the risk of an overcooked exterior increases with direct-only cooking.
More to Read
 Big Horn Outdoors® Expands Retail Presence with New Experience at Piedmont Outfitters
Big Horn Outdoors® is excited to announce a new retail destination for outdoor cooking enthusiasts. Customers can now experience the brand's popula...
Big Horn Outdoors® Expands Retail Presence with New Experience at Piedmont Outfitters
Big Horn Outdoors® is excited to announce a new retail destination for outdoor cooking enthusiasts. Customers can now experience the brand's popula...
 As Seen on NBC Daytime: Big Horn Outdoors® Pizza Oven and Infrared Steak Grill Featured on National Television
Featured on NBC Daytime, the 12-Inch Multi-Fuel Pizza Oven and 16-Inch Infrared Steak Grill demonstrate how Big Horn Outdoors® helps make high-qual...
As Seen on NBC Daytime: Big Horn Outdoors® Pizza Oven and Infrared Steak Grill Featured on National Television
Featured on NBC Daytime, the 12-Inch Multi-Fuel Pizza Oven and 16-Inch Infrared Steak Grill demonstrate how Big Horn Outdoors® helps make high-qual...
 Red Wine Mushroom Gravy Beef Tips on Infrared Grill
Master steakhouse-quality beef tips at home! Marinated for flavor, seared fast on an infrared grill, and topped with a rich red wine mushroom gravy.
Red Wine Mushroom Gravy Beef Tips on Infrared Grill
Master steakhouse-quality beef tips at home! Marinated for flavor, seared fast on an infrared grill, and topped with a rich red wine mushroom gravy.