Guides & Tips
Forget Takeout: How to Make Restaurant-Quality Pizza Outdoors

There’s just something special about pulling a perfect, bubbly pizza out of a real fire oven. You think it's something only a professional pizzeria can do? But once you get the hang of a few basics, you’ll be making incredible pizzas by yourself, in your backyard maybe, with your Big Horn® Outdoors pizza oven.
So here I'm going to walk you through everything you need to know, from the right gear to the perfect dough of making a restaurant quality pizza.
To get that classic pizzeria-style pizza (the kind with the puffy, leopard-spotted crust), the number one secret is intense, consistent heat. That's when you'll need a dedicated pizza oven for outdoor cooking.
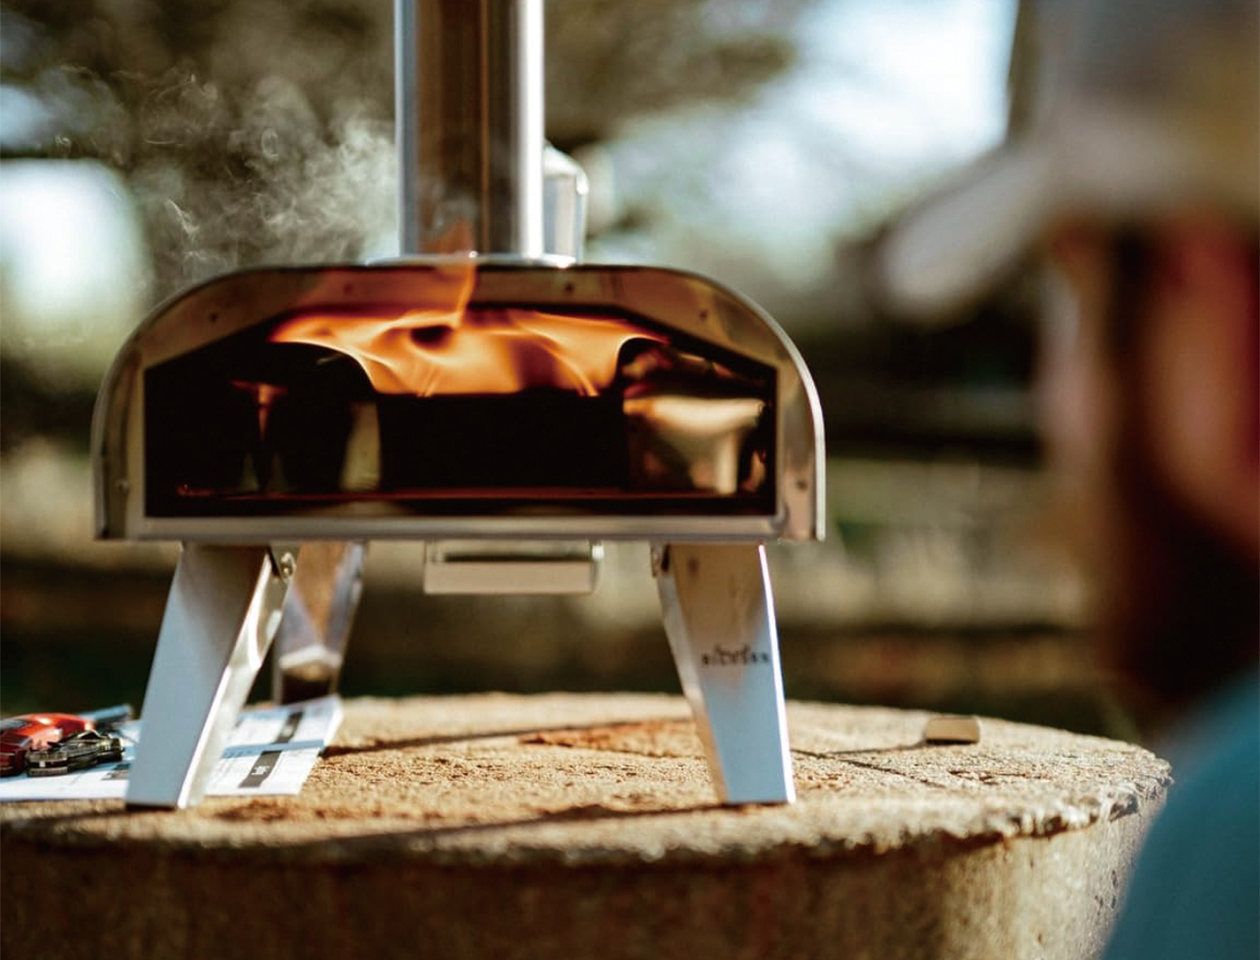
A good portable model, like the Big Horn® Outdoors Pizza Oven, can reach temperatures around 660°F. That level of heat is what allows you to cook pizza in about 90 seconds, creating a crispy base and a perfectly cooked, airy crust.
And the next thing to consider is your fuel source, which directly affects the flavor. There're many kinds you can choose from: Gas, pellets, electric, dual...
But for pizza cooking, those use wood pellets are great for a couple of reasons:
They provide a steady, reliable heat, and they infuse the pizza with that authentic, smoky flavor that you just can't get from a conventional kitchen oven.
Finally, think about the practical side of cooking outdoors. You'll want an oven that preheats relatively quickly, maybe around 18 minutes? Which is a good benchmark so you're not waiting around like forever.
And for backyard parties or camping trips, portability is key. Features like folding legs and a manageable weight (maybe about 25 lbs) make a huge difference when you're setting up or packing away.
You can still get great results on a regular gas grill. Just place a pizza steel on the grates, preheat it to 500°F, and your pizza will be done in about 8-12 minutes.
A good pizza peel is your best friend for getting pizzas in and out of the oven without any drama. A wooden one is great for assembling the pizza, while a metal peel is better for turning and taking it out.
An infrared thermometer is also a must-have. It tells you the exact temperature of your pizza oven, which is the secret to consistent, perfect pizzas every time.
Sure, store-bought dough is easy, but it just doesn't compare to the flavor of a homemade batch. If you're short on time, fresh dough from a local Italian market is a decent option, but making your own is cheaper and tastes way better.
This recipe makes enough dough for one 12-inch pizza (about 9 oz).
This special Italian flour is ground extra fine and has just the right amount of protein. It gives the dough an amazing, soft stretch so it doesn't tear when you're shaping it. Using it will make your pizza so much better. If you can't find it, a good quality bread flour will also work well.
This is perfect if you know you're having a pizza night tomorrow. Mix everything, divide the dough into balls, and pop them in the fridge. The long, cool ferment builds up an incredible flavor. Just remember to pull the dough out 1-2 hours before baking to let it come to room temp.
For those sudden cravings. Use slightly warm water (around 80-85°F) and a little more yeast (1 tsp). Find a warm spot for your dough, and it'll be ready to go in about 2-3 hours. The flavor will be milder, but the crust will be wonderfully light and airy.

When you're cooking with this much heat, keep the sauce simple. For that classic taste, just crush some San Marzano tomatoes by hand and add a pinch of salt. That's it. Jarred sauces with lots of herbs can taste bitter when cooked at high heat. Two or three spoonfuls is plenty for a 12-inch pizza—any more and you risk a soggy bottom.
If you're using watery vegetables like mushrooms or peppers, it’s a good idea to cook them a bit first to get rid of some moisture. For fresh mozzarella, tear it into chunks instead of slicing it, and give it a pat with a paper towel to dry it off.
Get all your ingredients prepped and ready to go before you start. It’s what chefs call mise en place, and it just means you'll have a smooth, stress-free time when your pizza oven is fired up.
Now the oven is preheated, the dough is prepared, and all of your toppings are ready. Time to transform that ball of dough into a pizza!
The first part is all about the heat. Preheat your oven until it reaches 480°F.
It's natural to want to believe hotter is always better, but NO! If the oven is too hot, the crust will burn before the toppings can cook.
To check if it's ready, point an infrared thermometer straight at the bottom. You're looking for the bottom's temperature, not the air inside the oven, since that's what's going to provide the perfectly crunchy bottom.
Step 2, get your pizza peel nicely floured and start stretching the dough. You're going for a thin base with a puffier crust around the edges. And here’s a pro-tip for you: the dough is ready when you can stretch it thin enough to let light through but without tearing.
As soon as the dough is stretched, you have to add your sauce and toppings immediately.
If you let it sit, the dough will start to get damp and stick to the peel, which will make launching it into the oven a real headache.
This is the trickiest part, but don't worry, you'll get the hang of it quickly.
Before you launch, give the peel a gentle back-and-forth shake to make sure the pizza is sliding freely. Then, aiming for the center of the oven, use one quick, smooth, and confident motion to slide it off the peel. Don't hesitate! Hesitation is the main reason for folded or stuck pizzas.
A pizza will cook in just 90 seconds to 3 minutes in your pizza oven, so don't walk away.
To ensure it cooks evenly and gets beautiful color all around, you need to use a turning peel or other long-handled tool to give it about a one-third turn every 30 seconds or so.
For this final step, your eyes are the best judge.
When you see the crust is fully puffed up with beautiful golden-brown spots, and the cheese on top is completely melted and bubbling, that means your masterpiece is done! Pull it from the oven, slice it up, and enjoy it while it's hot.
At the end of the day, making pizza with your Big Horn® Outdoors oven is about enjoying the process. Mastering the temperature, nailing the dough, and getting into a good workflow—it all comes with a little practice.
Start simple with a classic margherita, and go from there. Trust me, there's no better feeling than sharing a delicious, fire-cooked pizza you made yourself with the people you care about.
 10-Minute Grilled Chicken Parm Sliders: The Ultimate Game-Day Appetizer
Whether you are hosting a lively tailgate party, a weekend family gathering, or just need a quick and satisfying snack for game day, these Grilled...
10-Minute Grilled Chicken Parm Sliders: The Ultimate Game-Day Appetizer
Whether you are hosting a lively tailgate party, a weekend family gathering, or just need a quick and satisfying snack for game day, these Grilled...
 Bring the Steakhouse Home: 7 Sizzling Recipes for a Christmas Feast
Ordinary ovens fail to create that perfect steakhouse crust for your holiday feast. Master the 1500 degree infrared grill to serve juicy steaks ins...
Bring the Steakhouse Home: 7 Sizzling Recipes for a Christmas Feast
Ordinary ovens fail to create that perfect steakhouse crust for your holiday feast. Master the 1500 degree infrared grill to serve juicy steaks ins...
 How Do I Check the Accuracy of My Oven Temperature?
Ruined cookies are a thing of the past when you fix oven temperature accuracy. Use a simple oven thermometer for perfect oven calibration and consi...
How Do I Check the Accuracy of My Oven Temperature?
Ruined cookies are a thing of the past when you fix oven temperature accuracy. Use a simple oven thermometer for perfect oven calibration and consi...