Guides & Tips
How to Make Pizza Dough Using Poolish: The Secret to Airy, Restaurant-Quality Crust
Have you ever considered why pizza crust at a pizzeria tastes so much better than a homemade crust? Try using a pre-fermentation culture called "poolish" in your pizza dough. With a simple recipe and minimal time commitment, you can enjoy a light, airy, and fluffy crust with lots of holes to make each bite a delight, regardless of your pizza-making tools and technology.
A poolish is a damp starter culture using equal weights (100% hydration) of flour and water, with a touch of yeast.
A poolish does not create dough in one step, or by waiting for wild yeast to develop over a period of weeks, as in making sourdough. A poolish is mixed 12 to 24 hours in advance of making the final dough, where yeast ferments slowly. The end result will be holes in your pizza crust, which pizza enthusiasts desire.
Tip: While the recipe below uses volumetric measurements (cups), remember the fundamental rule of a poolish is that the flour and water must be equal by weight.
| Method | Preparation Time | Taste | Texture | Skill Level |
| Poolish | 12-24 hours | High | Light & airy | Easy |
| Direct Dough | 2-3 hours | Basic | Dense | Very easy |
| Sourdough | 3-7 days | High | Chewy & tangy | Advanced |
| Biga | 12-16 hours | High | Chewy | Moderate |
Why poolish works well in making pizza:
A poolish is very simple. For a basic starter to make dough sufficient for four 12-inch pizzas, you will require three ingredients.

Basic Poolish Recipe
Stir until smooth. Cover with plastic wrap or a damp cloth and leave at room temperature for 12-24 hours. The top will be frothy and convex, with a pleasant yeasty aroma—not sour or boozy.
Temperature timing is key here. With a room temperature of 70°F, peak activity will be around 16 hours. Hotter kitchens mean quicker processes; colder, slower ones. For flexibility, cold fermentation can be used. To mix a poolish, let it rise at room temperature for an hour and put everything in the fridge. Cold fermentation slows down fermentation and will give you a 48-hour time span to create your final dough.
Easy Weekend Timeline:
The longer fermentation not only adds flavor but also leads to a breakdown of gluten, making it easy to digest. Just think of marinating meat.
Once your poolish is bubbly and active, it's time to mix your final dough. It's easy, but a couple of things are important.
You'll need:
Add all this to a large bowl and mix with a wooden spoon until everything forms a shaggy dough. Do not worry if this looks a bit messy.
Transfer the dough to a lightly floured surface, and knead for 8 to 10 minutes. At this stage, it will be sticky, but do not add a lot of flour. As it is kneaded, it will become elastic.
How do you know you have kneaded enough?
Put this dough in a lightly oiled bowl, cover it, and allow it to bulk ferment for 1-2 hours at room temperature. The dough will have approximately doubled in size and will be light when you poke it. If you have a cold kitchen, you can put this bowl in a warm spot, but not too warm, or you will end up killing your yeast.
Cut the dough into four equal portions using a bench scraper or a knife. To make each piece into a tight ball, fold each portion inwards and roll it with your palm in a circular motion.
Put these balls of dough onto a floured surface and cover them loosely, and let them proof for 30 to 60 minutes. Letting them rest relaxes the gluten in them.
A dough with high hydration can be quite sticky. Here is how you can work with it:
Do not use a rolling pin, which will crush the air pockets.

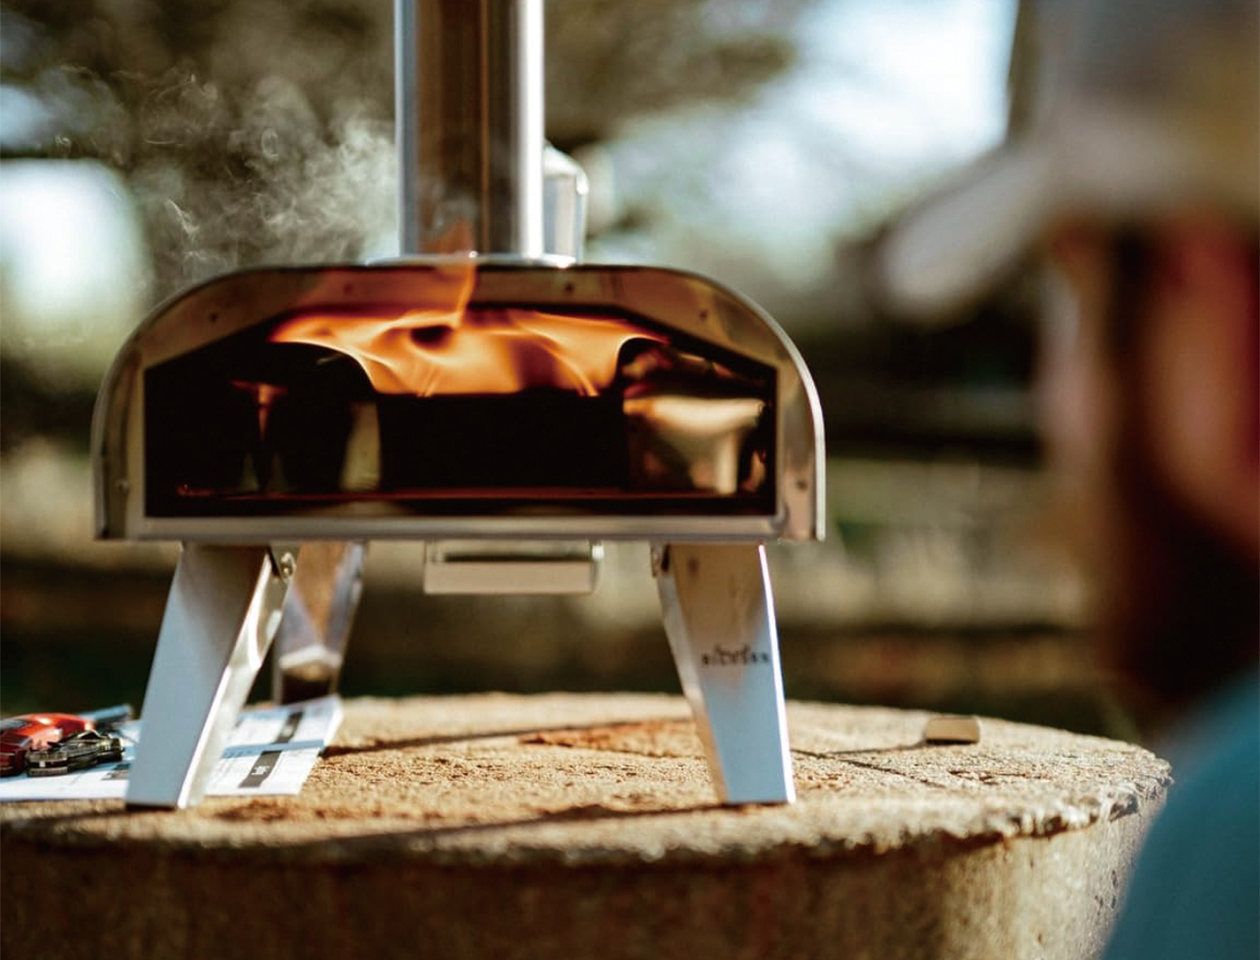
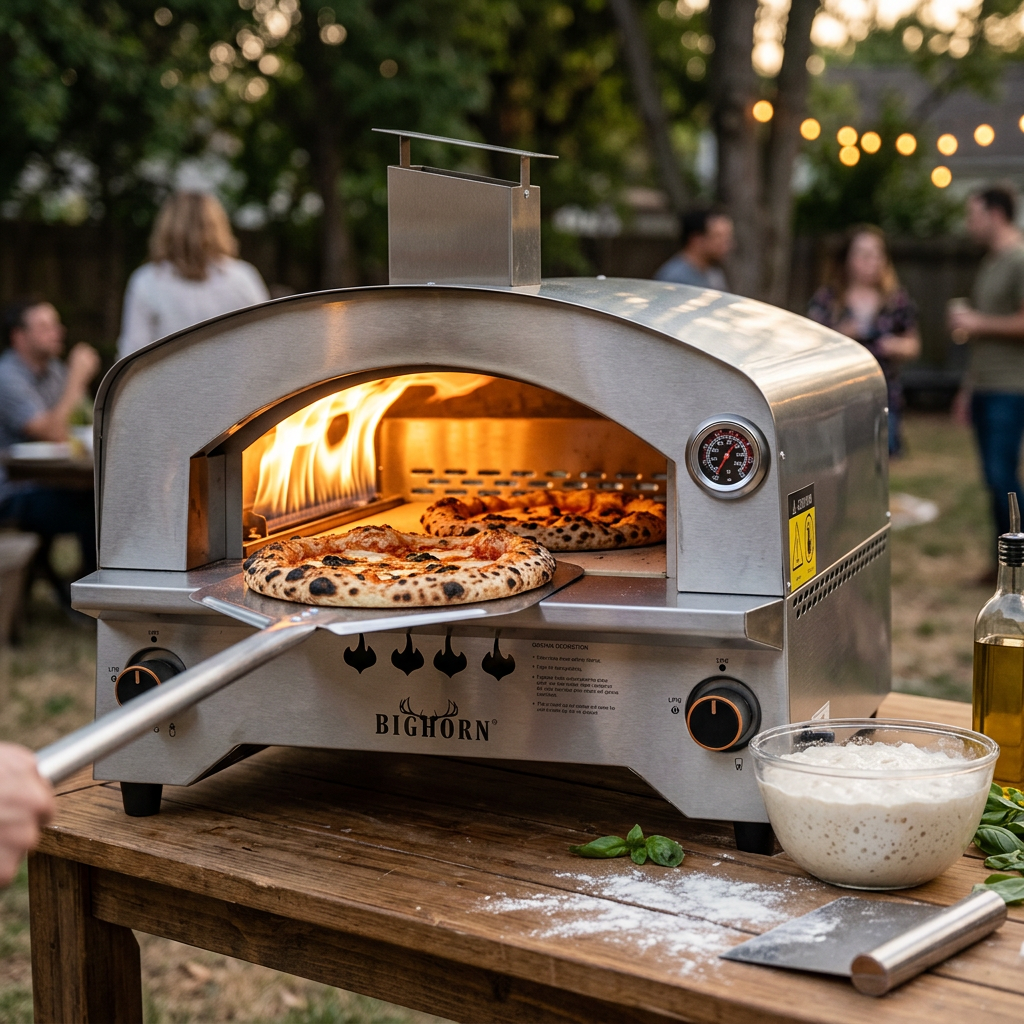
Now comes the exciting part: baking in an outdoor pizza oven. Outdoor pizza ovens get very hot, which is a great way to showcase a poolish dough.
Target temperatures by fuel type:
Put a pizza stone or steel in the oven to soak up all the heat. Allow it to preheat for 20-30 minutes.
Put your topped pizza onto the stone. Pizzas will bake in 60 to 90 seconds at such high temperatures. Turn them halfway for an evenly browned crust. The sugars in the poolish caramelize, and a crust with a soft interior is produced.
Quick troubleshooting:
Every oven is different, so you have to keep notes and adjust for next time. No worries, you'll get it soon.
A light and airy crust from a poolish is better paired with toppings that don't overpower it. Quality over quantity.
Avoid overloading with toppings. Poolish dough holds a lot of water; thus, too many toppings will make the inside mushy. Sauce should be thin, cheese moderate, and pre-cook damp vegetables such as mushrooms.
Even in professional bakeries, issues can arise. Here are solutions for fixing common problems.
Signs: Odor of chemicals/alcohol, collapsed surface, watery appearance
Solution: Use less yeast in the future (try using 1/16 tsp instead of 1/8 tsp) or refrigerate it sooner. The poolish will create a weak dough if it ferments for too long, which will rip easily during shaping.
Signs: Dough clings to all surfaces, won't hold shape
Solution:
Signs: Springs back a lot when pulled, tears at edges
Solution: Let the dough rest for a longer time. Cover it and let it relax for 15-20 minutes.
Possible Causes:
Solution: Ensure that your dough balls have a puffy appearance before baking and are wobbly, and make sure your oven is at the right temperature.
Working with poolish pizza dough isn't complicated, but it does take some planning in advance. With this technique, you can achieve a crust with the same level of flavor and crispness you know from your favorite pizza joints. With practice, working with poolish will become second nature.
To take your backyard pizza game to the next level, Big Horn Outdoors® is now providing gas, pellet, and electric ovens with enough intensity to allow your backyard pizza to have all the right qualities of a good pizzeria.
 Big Horn Outdoors® Expands Retail Presence with New Experience at Piedmont Outfitters
Big Horn Outdoors® is excited to announce a new retail destination for outdoor cooking enthusiasts. Customers can now experience the brand's popula...
Big Horn Outdoors® Expands Retail Presence with New Experience at Piedmont Outfitters
Big Horn Outdoors® is excited to announce a new retail destination for outdoor cooking enthusiasts. Customers can now experience the brand's popula...
 As Seen on NBC Daytime: Big Horn Outdoors® Pizza Oven and Infrared Steak Grill Featured on National Television
Featured on NBC Daytime, the 12-Inch Multi-Fuel Pizza Oven and 16-Inch Infrared Steak Grill demonstrate how Big Horn Outdoors® helps make high-qual...
As Seen on NBC Daytime: Big Horn Outdoors® Pizza Oven and Infrared Steak Grill Featured on National Television
Featured on NBC Daytime, the 12-Inch Multi-Fuel Pizza Oven and 16-Inch Infrared Steak Grill demonstrate how Big Horn Outdoors® helps make high-qual...
 Red Wine Mushroom Gravy Beef Tips on Infrared Grill
Master steakhouse-quality beef tips at home! Marinated for flavor, seared fast on an infrared grill, and topped with a rich red wine mushroom gravy.
Red Wine Mushroom Gravy Beef Tips on Infrared Grill
Master steakhouse-quality beef tips at home! Marinated for flavor, seared fast on an infrared grill, and topped with a rich red wine mushroom gravy.