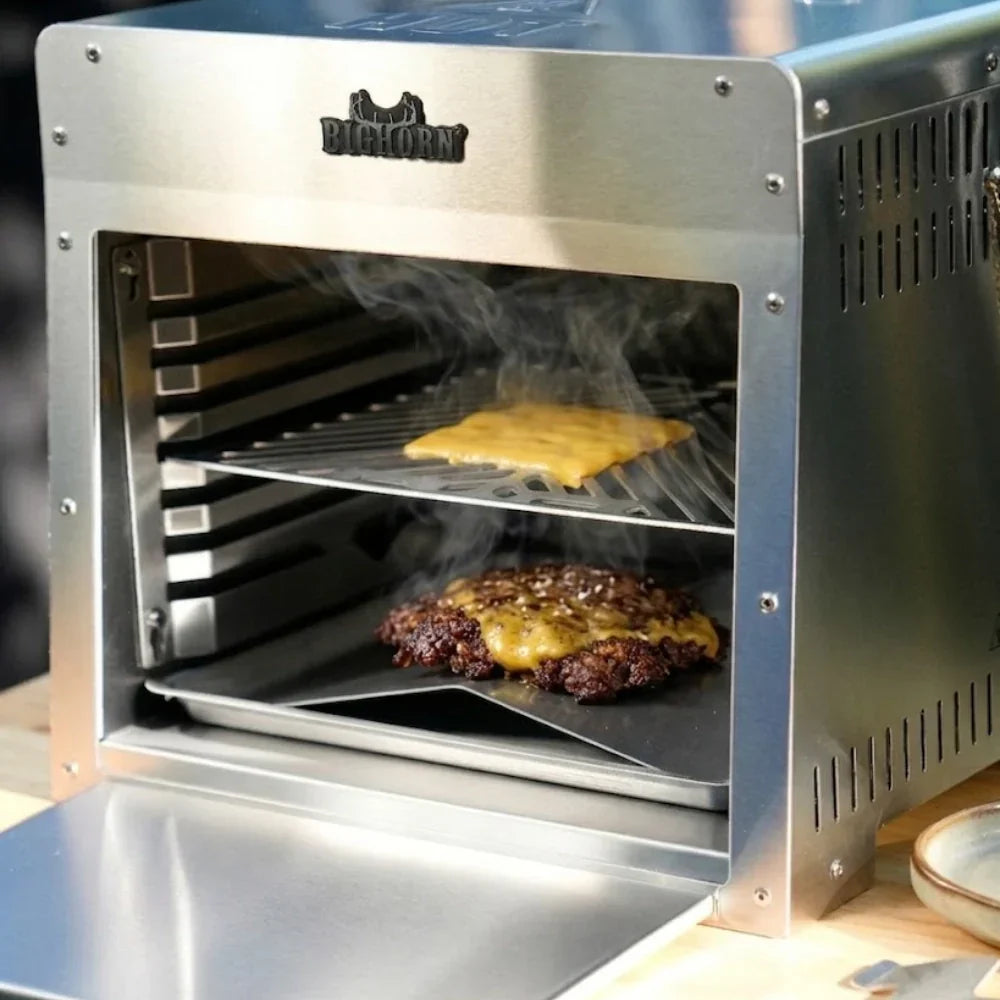
An infrared grill is a surprisingly capable setup for smash burgers, one that brings a few real advantages over a conventional gas grill. Place a cast-iron plate on the adjustable rack inside the broiler, set the rack to a mid-level position, and let the radiant heat do the work.
What Makes a Smash Burger Different from a Regular Grill Burger
The difference comes down to surface contact and fat retention. Both are areas where an infrared grill outperforms a standard setup.
The Science Behind the Crispy Crust
A smash burger works by pressing a loose ball of ground beef flat onto a screaming-hot solid surface. This maximizes direct contact between meat and heat, triggering the Maillard reaction, the chemical process behind that deep brown, savory crust. Thin patties develop a far higher ratio of browned crust to interior than thick ones, which is why a smash burger delivers more flavor per ounce than a standard patty.
A smooth, solid cooking surface is required. Grill grates create gaps between the meat and heat, and fat drips away instead of pooling around the patty. That pooled fat is what produces the lacy, crispy edges that define a smash burger.
Smash Burger vs. Regular Burger on a Grill
| Factor | Smash Burger | Regular Thick Burger |
| Crust coverage | Nearly the entire patty surface | Top and bottom edges only |
| Total cook time | Under 3 minutes | 6 to 10 minutes |
| Moisture retention | High: ultra-fast cook locks juice in | Moderate: longer cook draws more out |
| Best use case | Speed, crowd cooking, double stacks | Single large patty, medium-rare preference |
| Infrared heat advantage | Very high | Strong at the sear stage only |
A regular thick burger still benefits from infrared heat at the sear, but smash burgers extract more value from infrared's specific strengths. For most home cooks, smash burgers are the faster and more rewarding result on an infrared grill.

Why an Infrared Grill Is Actually Better for Smash Burgers
The three advantages below are specific to infrared heat and directly affect how a smash burger crust forms, how much moisture the patty retains, and what the final flavor tastes like.
Radiant Heat vs. Convection Heat
A conventional gas grill heats primarily through convection, with hot air circulating around the food, along with some radiant heat from the flame itself. An infrared grill heats a ceramic or metal element that radiates energy directly into the food. For smash burgers, that translates to a faster, more uniform crust across the entire patty surface with no hot or cold spots.
More Moisture Stays in the Patty
Infrared cooking circulates far less hot air than a gas grill, so the meat loses less moisture during the cook. For a thin smash patty that finishes in under 90 seconds per side, this moisture advantage shows up clearly in every bite.
Direct Radiant Heat Works Both Sides at Once
With a conventional gas grill, you sear one side at a time while the other faces open air. The top-down infrared element changes that equation. While the cast-iron plate builds your crust on the bottom through direct contact, the infrared burner overhead delivers continuous radiant heat to the top surface simultaneously, cooking both sides of the patty at the same time. The result is a faster overall cook, better moisture retention, and no relying on residual heat to finish what the surface started.
What Equipment Do You Need for Smash Burgers on an Infrared Grill?
You do not need a dedicated flat-top grill to make great smash burgers.
The Cast Iron Insert
You'll need a cast-iron griddle plate or flat insert as a separate purchase. Place it directly on the adjustable rack inside your infrared broiler to get the flat, solid cooking surface a smash burger requires. Look for a smooth-top plate sized to fit your grill's interior; a 10 to 12 inch round or a similarly proportioned rectangular plate works well for most models.
A Burger Press and Parchment Paper
A heavy burger press or a thick, rigid spatula gives you enough force to flatten a beef ball to about 1/4 inch in one firm press. Lay a small square of parchment paper between the press and the meat. This prevents sticking and lets you apply full downward force without tearing the patty. Remove the parchment paper immediately after pressing. At 475°F and above, it will darken and become brittle quickly if left on the cast iron surface.
An Infrared Thermometer
Infrared broilers run extremely hot. The best temp for smash burgers on a cast-iron surface is 475 to 525°F, hot enough for a strong Maillard reaction, cool enough to avoid scorching. An infrared thermometer gives you a real-time surface reading in seconds, which is far more reliable than guessing from the dial or rack position alone.
How to Make a Smash Burger on an Infrared Grill, Step by Step
The cook is fast. From the moment the first beef ball hits the cast iron, the entire process takes under three minutes.
Choosing and Prepping the Ground Beef
Use 80/20 ground beef: 80% lean, 20% fat. The fat content drives the Maillard reaction and keeps the patty from drying out. Keep the beef cold until it hits the cast iron. Cold meat holds its shape better under pressure and retains more moisture than room-temperature beef during the cook. Form loose balls of about 3 to 4 oz each. Do not pack them tightly or the patty turns dense.
Preheating Your Infrared Grill the Right Way
Set your infrared broiler to medium, not maximum. Place the cast iron plate on a mid-level rack position inside the unit and let it preheat for 3 to 5 minutes. Verify the surface with an infrared thermometer and target 475 to 525°F on the cast iron. If the surface reads above 550°F, lower the rack one position or reduce the heat setting. This is the most counterintuitive step for infrared grill owners: medium heat, not maximum.
Smashing, Seasoning, and Flipping the Patty
| Step | Action | Timing |
| 1 | Place the beef ball on the cast iron | N/A |
| 2 | Press flat with the burger press and parchment paper | Within 5 seconds |
| 3 | Season with salt and pepper immediately after smashing | Right after press |
| 4 | Cook the first side undisturbed until the edges are deeply browned | 60 to 75 seconds |
| 5 | Scrape and flip, capturing every browned bit | Single firm motion |
| 6 | Add cheese immediately after flip | Right after flip |
| 7 | Cook the second side | 30 to 45 seconds |
Season after smashing, not before. Salt draws moisture to the surface through osmosis, and a wet surface resists browning. Seasoning immediately after the press gives you a dry, flat surface that's fully exposed to the heat, which is exactly the condition the Maillard reaction needs.
Toasting the Buns Using Rack Positions
Move the buns to a lower rack position inside the broiler while the patties sear on the mid-level rack. Cut side facing up toward the heat, 30 to 45 seconds produces a light golden toast. For extra depth of flavor, brush the cut surface with a small amount of rendered beef fat that has pooled on the cast iron during cooking.

Common Mistakes to Avoid When Using an Infrared Grill for Smash Burgers
Infrared heat moves faster than most people expect.
Running the Grill at Full Power
At maximum output, a cast-iron plate inside an infrared broiler can exceed 600°F. At that temperature, the outside of the beef ball scorches before a proper crust can develop. Medium heat with a mid-level rack position keeps the surface in the 475 to 525°F range, which is the target window for smash burgers at home, high heat cooking. Check the surface temperature every single time.
Skipping the Flat Surface
Attempting to smash a beef ball directly onto the grill grates does not work. The meat falls through the gaps, loses all the fat that would feed crust formation, and never develops the crispiness that defines a smash burger. a cast-iron plate placed on the rack inside the broiler is the foundation of the entire infrared grill burger technique.
Pressing the Patty More Than Once
Smash once, firmly, within the first 5 seconds. After that, proteins in the meat begin to set. Pressing again after the meat starts cooking forces out the internal juices. One deliberate, full-force press is what the technique requires.
Start Making Smash Burgers on Your Infrared Grill
Use 80/20 beef, a cast-iron plate, and a medium heat setting with a mid-level rack position. Those decisions drive most of the final result. The infrared grill delivers the rest: faster crust formation than a flat top, better moisture retention than a gas grill, and a more consistent browning across the entire patty surface. If you want a grill built specifically for this kind of high-heat cooking, the Big Horn® 1500°F Infrared Grill delivers the surface temperature and radiant heat this technique demands.
FAQ About Smash Burgers and Infrared Grills
Q1: Is an Infrared Grill Better Than a Pellet Grill for Burgers?
It depends on the style. Infrared grills are superior for smash burgers because they reach higher temperatures for a better sear. Pellet grills are better for thick burgers, where you want to add smoky flavor over a longer cooking time.
Q2: What Is the Best Oil to Use on a High-Heat Infrared Surface?
Use an oil with a high smoke point, such as avocado oil or grapeseed oil. Avoid butter or extra virgin olive oil for the initial sear, as they will burn and turn bitter at the temperatures required for a smash burger.
Q3: Why Is My Smash Burger Sticking to the Press or Spatula?
Sticking usually happens because the meat is too warm or the tool is too cold. Place a small square of parchment paper between the press and the meat before smashing. Cold beef straight from the fridge also holds its shape better and releases more cleanly after the press.
Q4: How Do I Clean My Infrared Grill After the Grease From the Burgers Drips Down?
Let the broiler cool completely before cleaning. Remove the cooking grates and drip tray; both are dishwasher safe, which makes cleanup after a greasy smash burger session straightforward. For the cast iron plate, wait until it cools to a safe handling temperature, scrape off any residue with a stiff brush or spatula, wipe with a damp cloth, and apply a very light coat of oil to maintain the seasoning. Avoid submerging cast iron in water or placing it in the dishwasher.
Q5: Is It Possible to Make a Double Smash Burger on a Portable Infrared Grill?
Yes, simply stack the patties after the flip. Once you add cheese to the first patty, place the second finished patty directly on top. The radiant heat from the broiler melts the cheese and helps the patties bond together quickly.
More to Read
 As Seen on NBC Daytime: Big Horn Outdoors® Pizza Oven and Infrared Steak Grill Featured on National Television
Featured on NBC Daytime, the 12-Inch Multi-Fuel Pizza Oven and 16-Inch Infrared Steak Grill demonstrate how Big Horn Outdoors® helps make high-qual...
As Seen on NBC Daytime: Big Horn Outdoors® Pizza Oven and Infrared Steak Grill Featured on National Television
Featured on NBC Daytime, the 12-Inch Multi-Fuel Pizza Oven and 16-Inch Infrared Steak Grill demonstrate how Big Horn Outdoors® helps make high-qual...
 Red Wine Mushroom Gravy Beef Tips on Infrared Grill
Master steakhouse-quality beef tips at home! Marinated for flavor, seared fast on an infrared grill, and topped with a rich red wine mushroom gravy.
Red Wine Mushroom Gravy Beef Tips on Infrared Grill
Master steakhouse-quality beef tips at home! Marinated for flavor, seared fast on an infrared grill, and topped with a rich red wine mushroom gravy.
 Pro Tips: Grilling Thick-Cut Steak for Maximum Flavor
Master grilling thick-cut steaks at home. Learn essential prep, resting tips, and how to use 1500℉ infrared heat for a flawless, restaurant-quality...
Pro Tips: Grilling Thick-Cut Steak for Maximum Flavor
Master grilling thick-cut steaks at home. Learn essential prep, resting tips, and how to use 1500℉ infrared heat for a flawless, restaurant-quality...